In this article, you'll learn how to decide whether your new website gets a chat widget, and how it works if it does. It only takes a minute, and chat is often the first way a visitor reaches you. This step sets who answers them and who hears about it.
The Chat step is part of onboarding on the Website, Reviews + Website and SEO plans.
To get to the Chat step:
- Work through onboarding to the Website section.
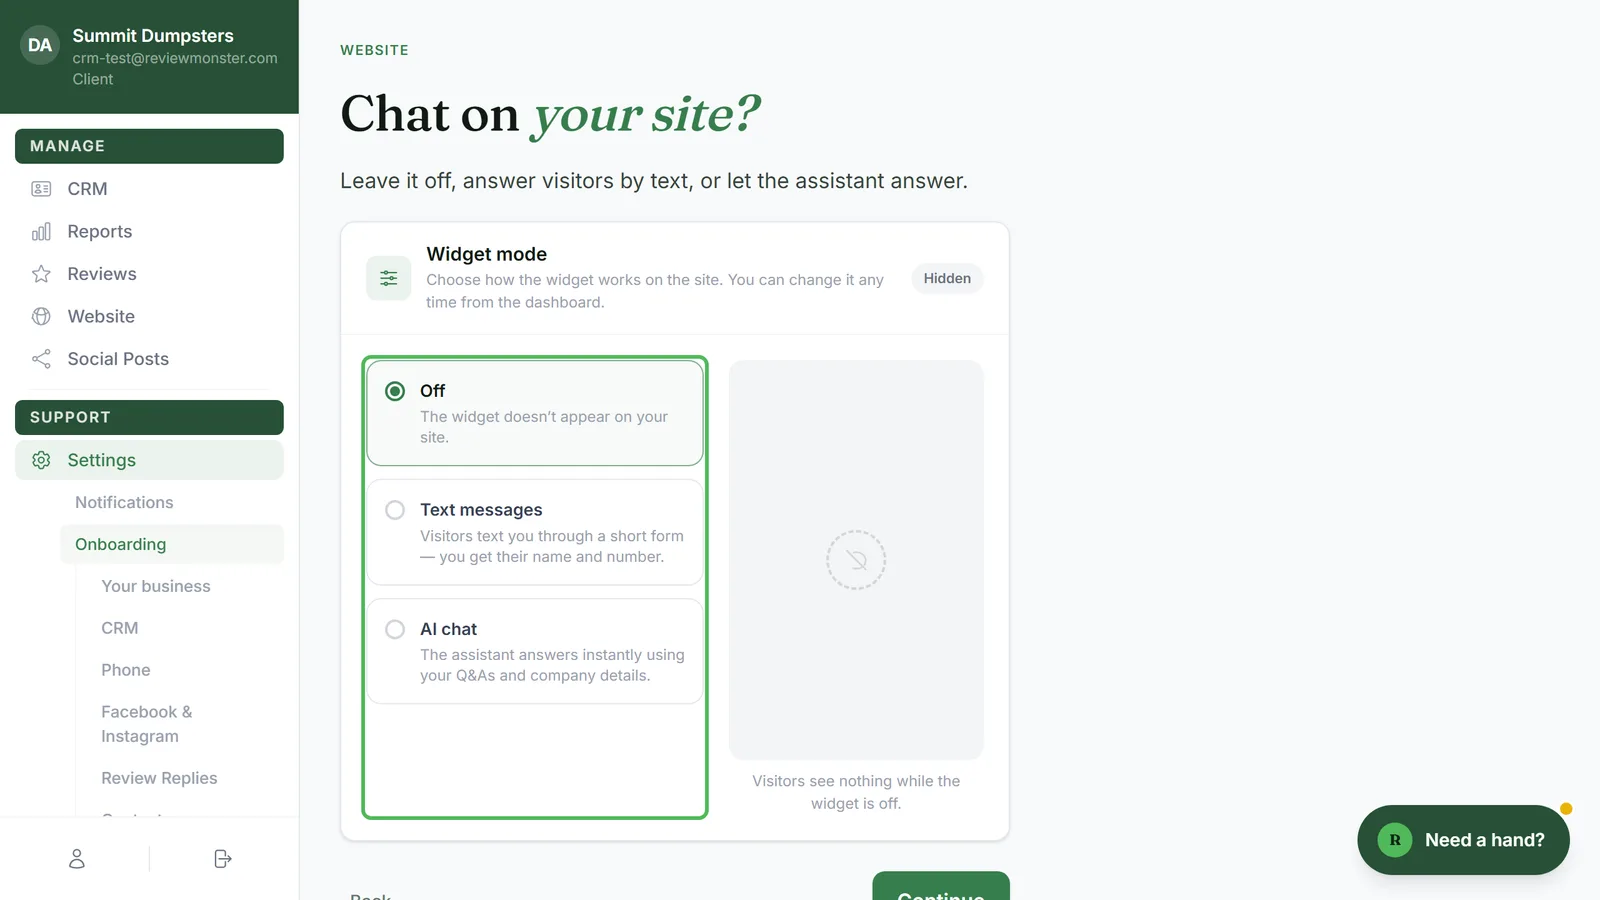
- On Leads & bookings, click Continue. The next screen is Chat, headed "Chat on your site?"
You can also reopen it from the dashboard. Go to Settings › Onboarding and click Chat in the list of steps.
Pick a widget mode
The Widget mode card lists three options on the left. On the right is a preview of what a visitor would see.
- Click one of the options:
- Off: the widget doesn't appear on your site. It's selected to start with.
- Text messages: visitors text you through a short form, and you get their name and number.
- AI chat: an assistant answers visitors right away, using your Q&As and company details.
- Check the preview. With Off there's nothing to see. With Text messages it shows the "Text us" form. With AI chat it shows a sample conversation.
The badge in the card's top right corner shows what you picked. It says Hidden when the widget is off, and Live · Text messages or Live · AI chat when it's on.
Choose who hears about chats
When you pick Text messages or AI chat, a Chat notifications go to card appears. It's filled in from details you gave earlier, so you'll usually just need to check it.
- In Text this mobile, check the mobile number. It has to be a full 10-digit US number.
- If you picked AI chat, also check the address in …and go to this email.
Here's what each mode sends you:
- Text messages: each message from the widget is texted to that mobile as a heads-up. You reply from your Review Monster CRM inbox, and the visitor gets your reply as a text.
- AI chat: once the assistant has a visitor's name and a way to reach them, that mobile gets a text and that address gets an email.
Teach the AI assistant
If you picked AI chat, three more cards appear below the notifications. They're the same three as on the dashboard's Chat Widget page, and anything already saved there shows up here.
Questions & answers
These are the questions customers ask most, with your answers written word for word.
- Click Add a question.
- Under Visitor asks, type the question, like "Do you offer free estimates?"
- Under Assistant replies, type your answer.
- To remove one, hover over it and click the x in its corner.
To pull in questions your website already answers, click Import from followed by your site's address. If no address is on file, the button reads Import from website. It scans the site and adds any questions you don't already have. Then it tells you how many it added, or that it found none. Read the imported answers before you move on.
Company details
This is background the assistant reads before it answers.
- Click Add company details.
- Give the block a title, like "Services we offer", then type or paste as much as you like under it.
A good start is one block for your services, one for your service area and one for your pricing or policies.
Instructions
These are rules the assistant always follows, whatever a visitor asks.
- Click Add a rule.
- Type the rule, for example "Never give exact pricing" or "Always ask for the visitor's name and phone number."
Save and move on
- Click Continue.
If you picked AI chat, your Q&As, company details and instructions are saved to the widget as soon as you click Continue. That way nothing's lost if you stop partway through onboarding. Empty rows are dropped.
The mode you picked switches on when you finish onboarding. If you chose Text messages and there's no mobile on your notification list by then, the widget stays off until you add one.
Changing your mind later
None of this is permanent. To switch modes, change who's notified or keep adding to what the assistant knows, go to Website › Chat Widget in the dashboard menu.
Related articles
- Turning on the chat widget
- Teaching the AI chat assistant about your business
- Telling your website where to send leads and bookings
- Reopening your onboarding steps from Settings
- Onboarding overview