In this article, you'll learn what each part of the Home screen shows, what you can do from it, and how to arrange the blocks yourself on a computer. Home is your quick look at the day: anything that slipped through, who you owe, the next job up and how the money's coming in.
To open Home:
- On the web, click Home in the menu.
- In the phone app, Home is the screen you land on when you sign in.
Needs attention
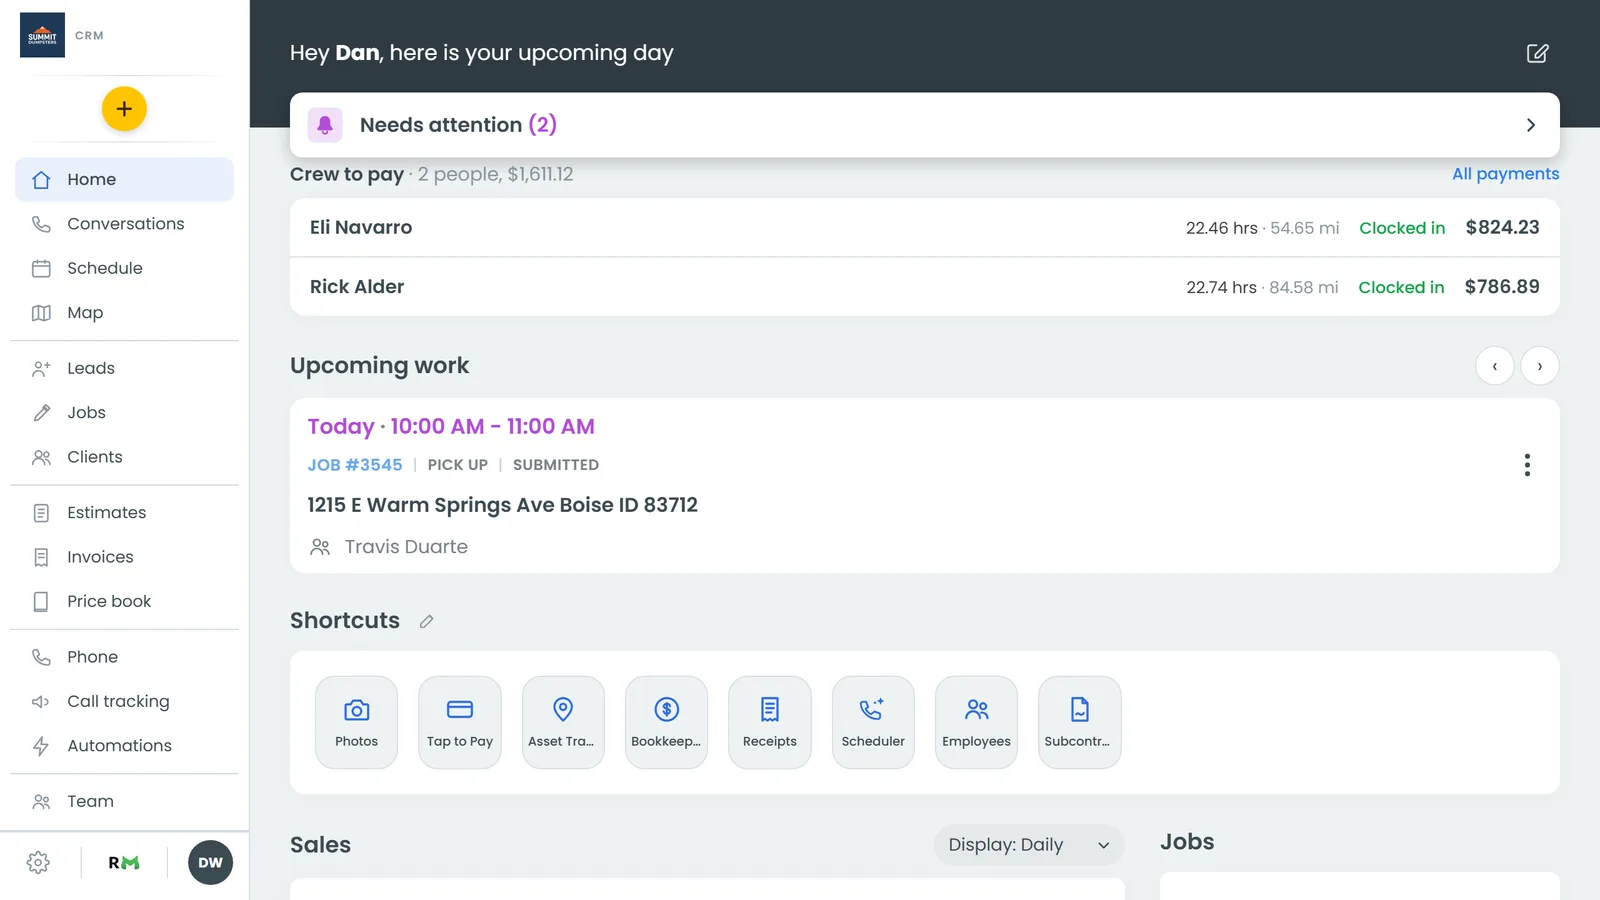
A dark band at the top says "Hey (your name), here is your upcoming day". The white Needs attention card sits over its bottom edge, with a count in brackets of everything waiting on you.
- Click or tap Needs attention to open it.
- Jobs from an earlier day that were never marked Done or Canceled show here, newest first. Each one says in red what's wrong, like "Never closed out — still In progress".
- Click View to open a job. On a phone or touchscreen, you can also swipe a job left for icons: a check to mark it done, an X to cancel it and, if your company has an on-my-way status, an arrow for on my way. Each one asks you to confirm first.
- Other notices have a Dismiss button. Dismiss takes the notice off the list and off the app icon's count. Notices without one leave on their own once you deal with them.
When there's nothing waiting, the card says "Nothing outstanding." Click anywhere outside the card to close it.
Crew to pay
If you use Subcontractors and someone is owed money, Crew to pay shows next. Each person is one row with their hours, a status (Clocked in, Ready to pay or No hours yet) and what they're owed. Click a row to open it.
- Under Hours worked, click edit on a time entry to move its start or end. If they're still on the clock, you can click Set an end time or Leave clocked in.
- Mileage and receipts they logged are listed too. Click one to fix it. A receipt also has Remove from pay, which takes it off what they're owed but keeps it on the Receipts page.
- The Owed block adds up receipts, mileage and hours, takes off anything Paid earlier, and shows the Total.
- Under Payment, pick how you paid and enter what you actually paid, then click Done to record it. With Venmo picked, Pay in Venmo opens Venmo with the amount filled in.
On a computer, All payments next to the heading opens the Subcontractors page. The figures refresh on their own while the page is open. When nobody is owed, this section doesn't show.
Upcoming work
Upcoming work shows one job card at a time, opening on the job happening now or the next one due. Swipe to step back through earlier jobs or ahead to later ones, and older jobs keep loading as you go back. On a computer, use the arrows next to the heading. Each card shows the day ("Yesterday", "Today", "Tomorrow", "Next Wednesday" or a date), the time, the job number, job type, status, address and customer.
- On a computer, click the job number or the address to open the job. On a phone, tap anywhere on the card.
- Click the ⋮ button for quick actions. On a computer you get Open job, On my way, Directions, Mark done and Cancel job. On a phone the list starts with Open and the job number, and the on-my-way entry reads OMW (or OMW - and the truck's name, one per truck if your company sends by vehicle).
- Directions on the web on a phone asks whether to use Apple Maps or Google Maps. In the app, an iPhone asks the same question and an Android phone goes straight to Google Maps.
- On my way, Mark done and Cancel job ask you to confirm before anything changes.
When nothing is booked, the card says "Nothing scheduled."
Shortcuts
Shortcuts is a grid of tiles for the features you've turned on. The pencil next to the heading opens Features, where you turn features on or off and change their order. The web and the app show the same tiles in the same order.
The blocks below Shortcuts
These are the blocks you'll see to start with:
- Sales is a bar chart of your job totals, with the total above it. Use the Display dropdown to switch between Daily, Weekly and Monthly. View All opens your Jobs list. If Bookkeeping is connected to your bank, the link becomes Income, Expenses and Both buttons.
- Jobs counts your Submitted, In progress, Done and Canceled jobs.
- Cash to deposit is the cash taken on jobs, less what's gone to the bank. Click Record deposit to log a trip to the bank. Recent deposits are listed underneath.
- Expenses shows when Bookkeeping is connected. Pick a month to see your Biggest expenses and any Unusual charges.
- Leads shows your total leads with a View All link.
- Estimates lists your estimates by status and tells you how many are approved and ready to convert. Declined ones aren't counted.
- Jobs by status lists every status you use with a count, and a total.
Three more blocks are waiting in + Add block (see below):
- Today shows today's jobs (and how many are done), their Job total and what's been Collected today, with an Open today link to the Schedule.
- Stripe shows what Stripe is holding for you: Pending deposit, Available, and what's on its way to the bank, with an Open Stripe link. If Stripe isn't connected yet, it has a Set up Stripe link instead.
- Today by tech lists each crew member's job total for the day, with any unassigned jobs and a Day total. A job with two people on it counts in full for both.
The phone app and the web on a phone show the blocks you've laid out on a computer, in the same order, stacked one under another. A block you've made half height shows its shorter version there. Until you've arranged them yourself, the phone leaves Expenses out.
Arranging the blocks on a computer
On the web, on a computer-sized screen, you can move, resize, remove and add the blocks below Shortcuts. Your layout is saved for you alone, in this company, and your phone follows it. You can't rearrange the blocks from a phone.
- Click the square pencil at the far right of the greeting band. The page dims around the blocks and a bar appears above them.
- Drag a block anywhere to move it. The others slide over to make room.
- Pull a block's bottom-right corner to resize it. Blocks snap to whole columns across, and to half or full height.
- Click × on a block to remove it, then click Remove to confirm, or Keep to leave it.
- Click + Add block to put back a block you removed, or add Today, Stripe or Today by tech. Each one shows a small preview, what it shows and its size, and lands at its normal size when you click Add.
- Click Done when you're finished. Reset puts the blocks back the way they started.
Good to know
- You choose whether past-due jobs show in Needs attention. In Settings › Notifications, use the Needs attention column on the Job past its day, not closed row.
- If your login has more than one company, the card on the band becomes a company picker and Needs attention moves just below it.
- In the app, the band also has a Refresh button and search, plus the Automations bolt on paid plans. Pulling the page down refreshes it too.
- A role without the Dashboard permission opens on the Schedule instead of Home.