In this article, you'll learn how to create a job and what the New Job form asks for. A job is booked work with a date and time, so getting it in right means it lands on your calendar, on the right customer, with the right crew.
Ways to start a new job
There's more than one door into the same form. Use whichever is closest to where you are.
From the Jobs list:
- In the menu, click Jobs.
- Click Create New at the top right.
From the + in the menu:
- Click the yellow + in the menu.
- Choose New job.
From the calendar:
- Open the schedule in Day or Week view.
- Click an empty stretch of a day to start a one-hour job at that time, or click and drag down to cover the time you want.
The form opens with that date and those times already filled in.
From a client's page:
- Open the client.
- Click Create new, then Job.
The form arrives with their name, contact details and main address filled in.
On the phone app:
- Tap Create New on the Jobs screen, or tap the + on the bottom bar and choose New job.
- On a client's page, the New job option starts a job for them.
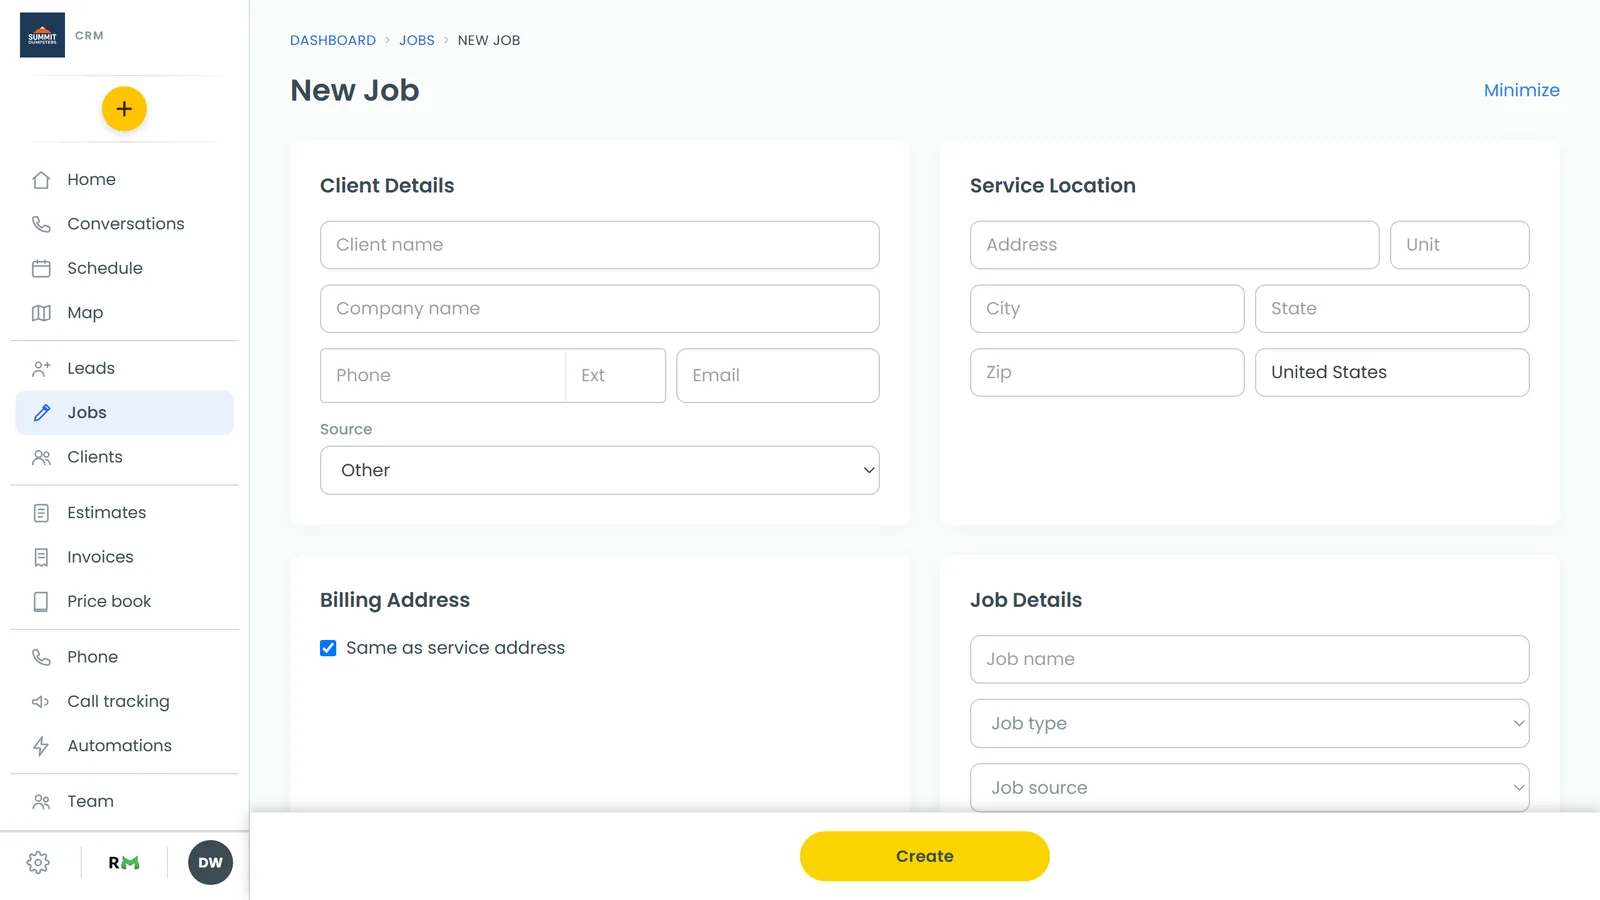
Filling in the New Job form
Business
If you've linked another of your businesses, a Business picker shows at the top. Pick the business the job belongs to, and the form uses that business's job types, sources and team. If you don't run more than one business, you won't see it.
Client Details
- Start typing in Client name. Matching clients show as you type.
- Pick one to put the job on that existing client. Their company, phone and email fill in, and so does their address if you haven't typed one yet.
- For someone new, just keep typing their name, then fill in Company name, Phone (with Ext if needed) and Email.
A brand-new customer also gets a Source picker, so you can record where they came from. It starts on Other until you change it.
If you pick an existing client and then change their name, company, phone or email on the form, the CRM asks when you save whether to update their record too. Click OK to update the client, or Cancel to keep the change on this job only.
Service Location
Type the address and pick a suggestion from the list. City, state and zip fill in for you. You can still edit any field, and an address that doesn't show up in the suggestions can be typed in by hand. There's a separate Unit box.
Billing Address
Same as service address is ticked by default. Untick it if the bill goes somewhere else, and enter the billing address underneath.
Job Details
- Job name: an optional label for the job.
- Job type: pick from the job types you've set up.
- Job source: where this job came from.
- Job description: notes about the work.
Scheduled
Every job here has a time. Unlike a lead, there's no option to leave it unscheduled.
- Set Starts and Ends, each with a date and an At time. The form starts on today, at your opening time, for two hours. Change the start time and the end moves to two hours later.
- Tick All-day event to book it for the hours you're open that day.
- Use Assign team members to put people on the job. If you're the only person on your team, you're added automatically.
- To repeat the job, click Set recurring schedule.
Saving the job
- Click Create on the bar at the bottom of the screen.
- The new job opens so you can add items, send an estimate or carry on.
If you booked it into a linked business, you land back on your calendar instead, where the job shows with that business's badge.
The CRM doesn't stop you booking outside your business hours, so check the time before you save.
To move a job to another time or person once it's on the calendar, see How to schedule and manage jobs.
Related articles
- How to create recurring jobs
- Assigning team members to jobs
- How to add job types
- How to schedule and manage jobs
- Creating new jobs on the phone app