In this article, you'll learn how to build an automation rule from start to finish. Once a rule is saved, the CRM sends reminders, follow-ups and review requests for you, so nobody has to remember them.
If you're new to Automations, start with Automate your routine tasks with Automations. This article covers the rule editor in detail.
To open Automations:
- On the web, click Automations in the menu.
- In the phone app, tap the lightning bolt at the top of the Home screen. You'll also find Automations in the side menu.
Start a rule
There are two ways in. Pick whichever is closer to what you want.
From a template
The Discover tab has ready-made rules grouped under Reminders, Marketing, Follow-ups and Actions. Each one opens in the editor already filled in, and you can change any part of it before you save.
- Click the Discover tab.
- On the web, hover over a template card and click Use. In the app, tap the Use button on the card.
From scratch
- Click + Add automation at the top right.
- A blank rule opens, called New automation, that reads "When this happens" and "do this".
Name the rule
The name field sits at the top of the editor, next to the pencil. Click into it and type a name you'll recognize later, like "Day-before reminder" or "Estimate follow-up".
Choose what sets it off
The When row is the trigger.
- Click this happens.
- Search or scroll the list, then pick an event.
You can choose from:
- A job is created, is scheduled, has a status or is done
- An invoice is sent, is created or is due
- An estimate is sent, is approved or is created
If you pick has a status, click the … that appears after it and choose the job status.
Once the trigger is set, each underlined word becomes its own control. Click a job, for example, to switch to an invoice or estimate.
Choose what happens
The second row is the action.
- Click do this.
- Pick one:
- send client a text message, an email, or a text and email
- send your team a text message or an email
- send client a review request
When you send to your team, a to: line appears under the sentence. Click the people who should get it. If you don't pick anyone, it goes to the account owner.
A review request uses the wording and image from your review settings, not a message you write here. Preview/edit message shows you a sample, and Edit in Review settings opens the page where you change it.
Set the timing
- Click within a defined time.
- Choose immediately, ahead of or after.
- For ahead of or after, type a number and pick minutes, hours or days.
- Click the underlined word at the end of the sentence to choose what the timing counts from:
- Jobs: schedule date or end date
- Invoices: date of sending or due date
- Estimates: date of sending
Immediately sends right when the trigger happens.
Clearing a row
Click the trash icon at the right of the When row or the action row to clear it and pick again.
Add conditions
Conditions narrow down when the rule sends, like only for one job type or only when an invoice still has money due. Click Add condition under the sentence. Adding conditions to your automation rules walks through every option.
Set when it's allowed to send
At the bottom left, Automation will be sent has two times. New rules start at 9:00 AM to 9:00 PM. Anything due outside that window waits until it opens. Untick the box to let the rule send at any hour. There's more in Setting when automations are allowed to send.
Write the message
- Click Preview/edit message.
- In Customize your message, type a Subject if the rule sends an email. The subject box only shows for email or text and email.
- Write the message in the big box.
- Click a short code under the box to drop in details from the job, invoice or estimate, like the client's first name or the job date.
- Click ✓ Save and close.
Save the rule
Click Add automation for a new rule, or Update automation if you're editing one. If you haven't picked a trigger and an action yet, you'll see "Pick what happens and what to do first."
New rules are saved turned on and start working right away. The switch on the rule's card is the only on/off. Turning off and deleting automation rules covers pausing and removing rules.
Check what a rule has done
Saved rules are listed on the My Automations tab. Each card shows when the rule was created or last changed, how many times it has been triggered, and how many conditions it has.
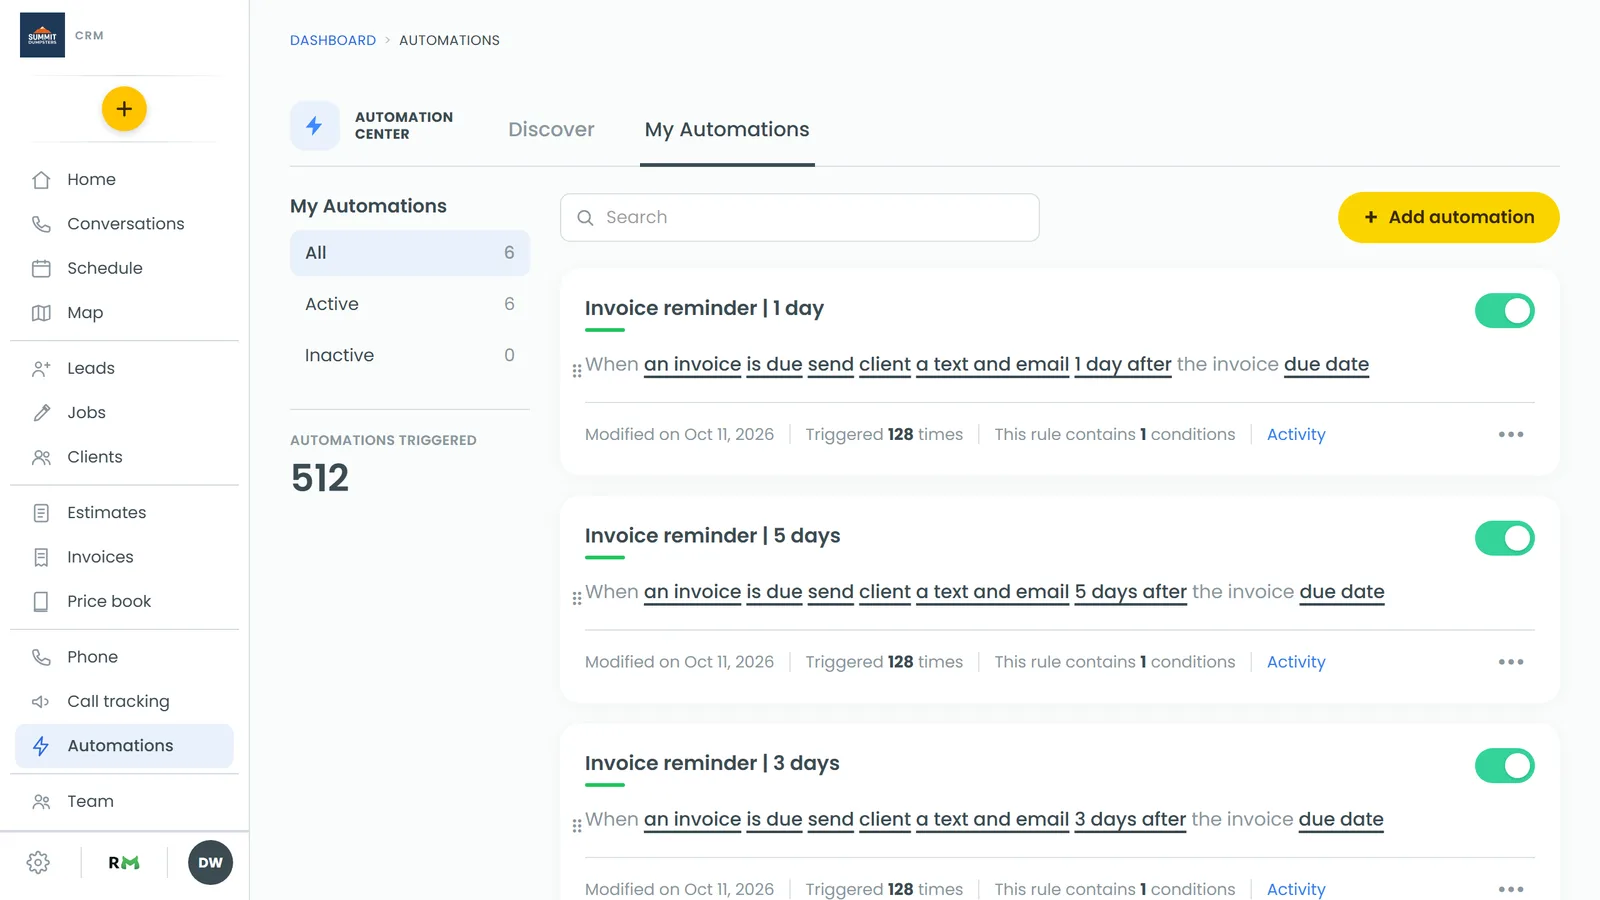
Click Activity on a card to see each message the rule handled, marked Sent, Scheduled, Skipped or Failed, along with who it went to and the message itself.
Related articles
- Automate your routine tasks with Automations
- Adding conditions to your automation rules
- Automations short code guide
- How to duplicate an automation rule
- Turning off and deleting automation rules