In this article, you'll learn your way around the Transactions tab in Bookkeeping. Your bank charges and deposits show up here, get filed into categories and get approved. Once you know what each part of the screen does, a month of books takes a few minutes instead of an afternoon.
To open your transactions:
- In the menu, click Bookkeeping.
- Make sure Transactions is selected at the top right, next to Rules & settings.
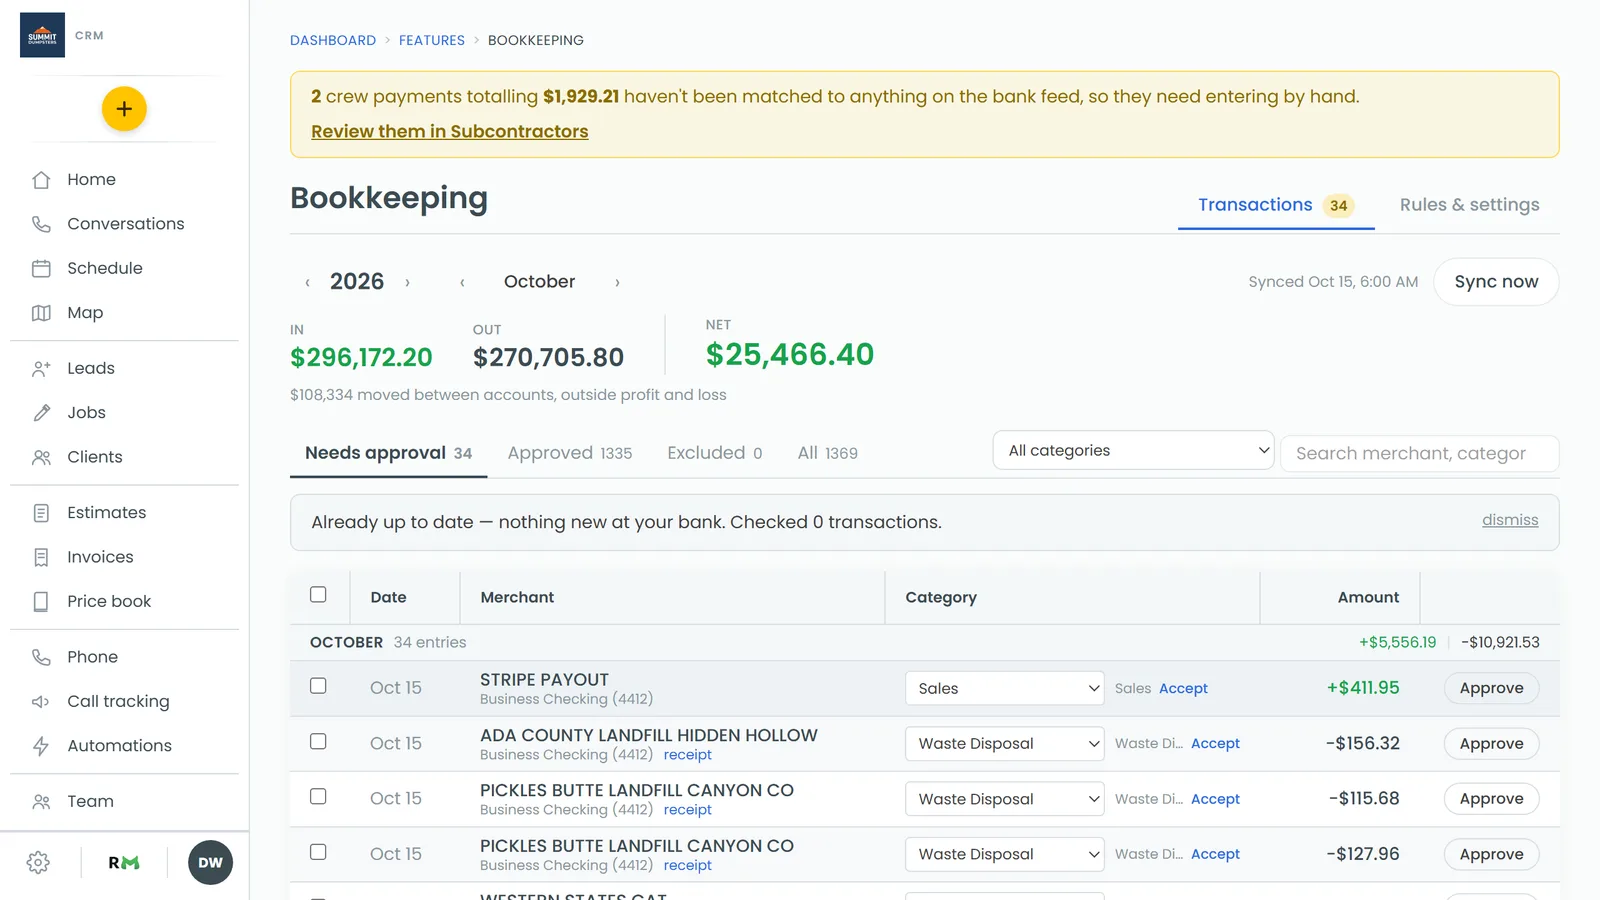
The two tabs at the top
Two tabs sit on the same line as the Bookkeeping heading:
- Transactions is the ledger itself. A small yellow number next to it counts every transaction still waiting for approval across the whole year, not just the month you're looking at, so a charge from March doesn't hide while you're in August.
- Rules & settings is where your rules, accounts and automation live. See Bookkeeping settings: accounts, automation and always approve.
Moving through the year
At the top left there are two sets of arrows.
- The year arrows load a different year. The whole year comes onto the screen at once.
- The month arrows don't filter anything. They scroll you to that month's section, and the rest of the year stays above and below it. Click the month name to jump back to it. If a month has no transactions, the arrow takes you to the nearest month that does.
Under the arrows you'll see In, Out and Net for the year. Money moved between your own accounts isn't counted in those; it shows as a small line underneath instead. If your transfers don't add up to zero, a red line replaces it and tells you how far over or short they are.
Syncing with your bank
To pull the latest from your bank:
- Click Sync now at the top right.
- Watch the progress bar while it checks your bank and files what's new.
- Read the summary that appears when it's done.
If nothing new came in, the summary says Already up to date — nothing new at your bank and how many transactions it checked. If something did, it tells you how many are new, how many were filed by rules, matched to receipts, suggested and auto-approved.
Next to the button, Synced with a date and time shows when your bank data last updated. The CRM also syncs by itself when you open the tab and a sync is due, so you may see the progress bar without clicking anything.
The four views
Under the arrows are four views, each with a count beside it:
- Needs approval — anything not approved yet and not excluded. This is where you'll spend most of your time.
- Approved — everything you or the CRM has signed off.
- Excluded — transfers and other lines kept out of your books.
- All — every transaction for the year.
Filtering and searching
To the right of the views:
- The All categories drop-down narrows the list to one category. Each option shows that category's total.
- The search box (Search merchant, category, amount…) looks through the whole year, not just what's on screen, and shows how many matches it found.
Reading the table
The table has Date, Merchant, Category and Amount columns. Deposits show in green. To make a column wider or narrower, drag the edge of its header. The CRM remembers your widths in that browser.
Each month starts with a header row showing the month, how many entries it has, and its money in and money out.
Next to a filed category you'll see a small word saying where it came from:
- rule — one of your rules filed it.
- receipt — it was matched to a receipt.
- you — someone picked it by hand.
- AI — the CRM's suggestion was used.
When the CRM has a suggestion you haven't taken yet, you'll see the suggested category with an Accept link instead.
The last column is what you can do with the row. A filed row has an Approve button, an approved row says Approved (hover it to Undo), and an excluded row has Include. In Needs approval, filed rows also get a checkbox so you can approve several at once with Approve selected. See Categorizing and approving transactions.
Opening a transaction
To see more about a transaction:
- Click the merchant name.
- The row opens underneath with more options.
In the open row you can:
- Click Split into categories to divide one charge across several categories. See Splitting a transaction across categories.
- Click Exclude (transfer, not an expense) to keep it out of your books. See Excluding transfers and other non-expenses.
- Type in Add a note. It saves when you click away, and shows under the merchant name.
The open row also shows a Matched receipt box when a receipt is attached, filed by rule with the rule that filed it, and approved by with who approved it.
The yellow banners
Two yellow banners can appear at the top of the page:
- One counts receipts paid from other accounts, like a personal card, cash or Venmo. Those won't come in from the bank, so they need entering by hand. Click Review them in Receipts to see them.
- One counts crew payments that haven't been matched to anything on the bank feed, with their total. Click Review them in Subcontractors to see them.
On the phone app
The phone app has the same Transactions tab, with a few differences:
- There's an extra Reimbursements view listing receipts paid from other accounts, each with a Mark recorded button.
- There are no In, Out and Net figures, and no Date column.
- Sync now sits next to the category filter. There's no progress bar; you get a short note when it's done. You can also pull down to refresh.
- Month headers show the entry count only.
- You can't open a row, so splitting, excluding and notes are web only.
- Long lists show the first part of the year, then a Show more button at the bottom.
Related articles
- Categorizing and approving transactions
- Creating categorization rules
- Splitting a transaction across categories
- Recording expenses paid from personal accounts
- Reading your books at month end